Categories
Blog

Foam Rolling

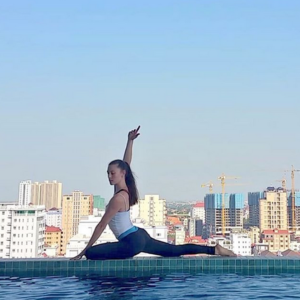
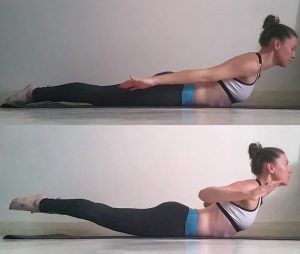
I first started foam rolling after subscribing to StudioVeena who recommended it for use before stretching.

In her tutorials she would outline how to roll the large muscles in the legs before flexibility training, as a way to increase blood flow to the muscles and loosen up knots and tight areas before working on regular stretching sequences. Foam rolling is a great way to loosen up before getting on the mat for yoga, or can be a great way to assist with recovery if you find your muscles a little overworked from a workshop or yoga retreat.

Physios and massage therapists sell a variety of foam rollers and spiky balls of all shapes, sizes, and firmness depending on how they will be used. As well as being a great asset to your flexibility training, foam rolling can work wonders on DOMS, and be generally soothing for an active body. Chunky rollers are great for larger muscles. Spiky balls are perfect for getting into smaller muscle groups in the back and shoulders, or for massaging the forearms after training.

When choosing your foam roller, keep in mind your tolerance during a regular massage. The softer the roller the softer the pressure, and the firmer or spikier the roller, the more it will dig in to those tight spots. A deep tissue experience can be effective but you don’t want to be in so much pain that you can’t commit to rolling up and down your leg!

I started with a hard, smooth roller that I picked up at the local Clark Rubber supplier! It’s the perfect density to use everyday, before stretching or after training, large enough to roll my hamstrings, quads, and glutes, but also small enough to throw in the car if I need to bring it along to a comp or showcase. Now I prefer something a bit chunkier that helps release tight glutes or hamstrings.

Foam rolling is a “self-myofascial release technique” that works by massaging the fascia and muscle fibers. Research suggests,

“Self-myofascial release causes an increase in short-term flexibility that lasts for >10 minutes but does not affect athletic performance acutely. Self-myofascial release may also be able to increase flexibility long-term, in programs of >2 weeks.”

Sounds pretty good right?

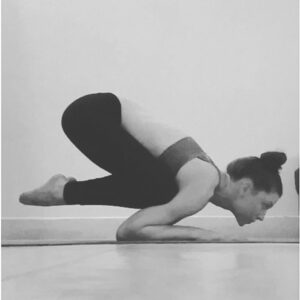
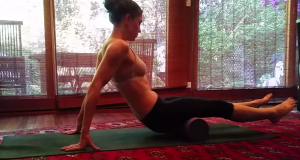
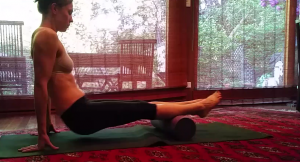
Here are some photos of how I use my roller at home. You probably need a space similar to what you use for yoga to make sure you can lay down and roll in various directions. It’s a great practice to turn into a habit though, and once you know what you are doing, it’s easy to incorporate into your day, even while watching television!

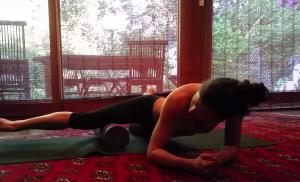
I like to start on my legs and glutes, remembering to roll up and down the entire muscle and at various angles.

Foam Rolling glutes

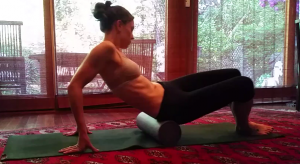
While sitting on the foam roller, I angle my body to either side, rolling in the direction of the muscle fibers. By placing my foot on the floor or lifting it up, I can change how much of my body weight I am putting in to the motion. Listen to your own body as you roll, slow down on the “sweet spots” – those trigger points that seem to be more painful than others – or even pause for up to 30-60 seconds and you will find the tension begins to release.

Foam Roller Hamstrings
Foam Roller Calves

My roller is long enough for me to do my hamstrings, calves and quads side by side. Though once again, I can change the amount of pressure I’m applying by rolling them one at a time or leaning into  it at a different angle.

Foam Roller Quads

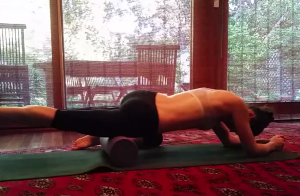
Some people also roll their IT Band, along the outside of their thigh. I find this incredibly painful but sometimes have the nerve to work up to it, rolling over from during my quads to catch it as I roll down my outer thigh.

Foam Roller Adductors

Rolling your adductors, or inner thigh, can be a bit tricky, however those with good hip flexibility may find this easier. Try and cover as much of the muscle as possible and don’t forget to slow down or pause over any trigger points.

Foam Rolling Stretch
Foam Rolling Forearms

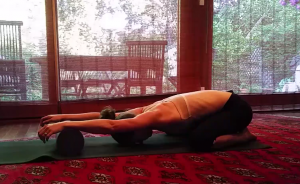
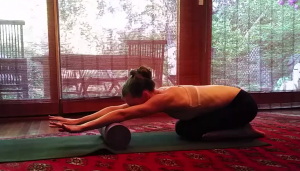
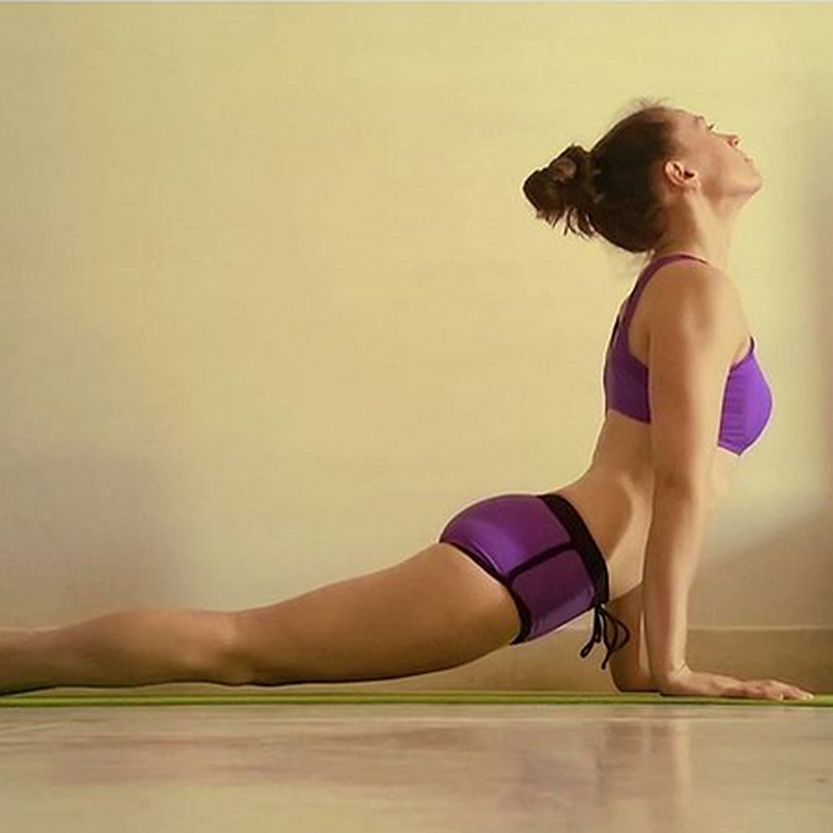
Recently I have been rolling my forearms and upper back and then using the roller to perform and overstretch for my shoulders. After rolling up and down my forearms, with the large foam roller and a tennis ball, I sink back into a child’s pose with my arms resting on the roller. Breathing into the stretch, I try to sink my chest down to the floor, feeling the stretch along my upper arms, down my lats under my shoulder, and across my shoulder blades. Coming out of the stretch I try to curl my spine in the opposite direction, remembering to breath as I come out slowly.

Don’t forget to drink lots of water post foam rolling session. Any type of massage increases blood flow around the area and staying hydrated will help the lymphatic system and circulatory system do it’s job, reducing the chance that you’ll feel groggy and need a nap after your session.

If you are interested in learning about how foam rolling could benefit your yoga practice, or at home workout, contact me for a Live Coaching Session!

Categories
Blog

Nutrition for Yogis and Aerialists

Since moving to Cambodia, my training schedule and format has changed dramatically. It rarely drops below 30C here, even at night, meaning that even a simple walk up and down the Riverside turns me into a dripping mess.

Joining the circus to train on lyra and silks in a large warehouse with no air conditioning also has it’s challenges. By observing and listening to how the locals train and manage the risks of dehydration, I have learned a lot about how to maintain optimum form during my training sessions, and to recover adequately afterwards.

It’s common practice to consider carbs and protein intake when thinking about how to prepare for, and recover after, a workout. But if you find yourself finishing your yoga practice sessions utterly exhausted, or taking longer to recover than your peers, or even if you feel sluggish mentally and emotionally days after your workout, your diet could be lacking in trace elements that support your body and it’s functions.

Trace elements such as zinc, magnesium, potassium, iron, and selenium occur in many foods that you may already be eating. Depending on how intense your training sessions are, and the unique make up of your body, you may need to consider adding more or less of each of the ones described below. Ensuring that you are eating nutrient dense foods before and after your practice will support your energy levels throughout the workout and your recovery afterwards.

Let’s look at each mineral, how they work together, the effect it has on your body and which foods will offer you these benefits *

Zinc supports the function of over 200 enzymes in your body, including wound healing. If your pole kisses are beginning to build up, adding more foods with zinc in your diet could help them heal. Zinc also works to strengthen the villi in your intestines, increasing the surface area of your digestive tract, allowing your body to absorb more nutrients.

Where to find zinc – Brazil nuts, pecans, kelp, beans, cashews, chickpeas, whole grains, dairy foods, egg yolks, liver, red meat, seafood, oysters, dulse flakes.

Calcium is important for bone health and muscular growth as well as cardiovascular health. Your levels of vitamin D affect how much calcium you are absorbing from your food so make sure you get a little bit of sun every day too – what more of a reason do you need to take your mat outside or to the beach?!

Where to find calcium – almonds, brewer’s yeast, Chinese cabbage, kale, broccoli, salmon and sardines (with bones), dairy products, fortified foods such as cereals and tofu.

An important mineral that works in conjunction with zinc and calcium, supporting strong bone health. The trio (zinc, calcium, copper) also help transport red blood cells around the body – read: more oxygen delivered to your muscles.

Where to find copper – Cocoa, peas, raisins, almonds, barley, beans, beetroot, broccoli, oysters, liver.

Required for strong and flexible joints, skin, and bones. Silicon also supports the health of your heart. By ensuring foods with silicon are part of your diet everyday, you set yourself up to be able to train from a strong and healthy starting point.

Where to find silicon – alfalfa sprouts, beetroots, brown rice, oats, capsicum (peppers) apples, cereals, raw cabbage, peanuts, carrots, onions, cucumber, pumpkin, fish, whole grains, almonds, and oranges.

Supports strong healthy bones, nerves, and muscles. This element is also responsible for regulating blood sugar levels. If you find you are craving sweets or a high energy hit after a workout, adding foods rich in manganese could help you curb the cravings and stabilize your blood sugar levels throughout the day.

Where to find manganese – avocados, nuts, pulses, tea, whole grains, seeds, pineapple, and seaweed.

Selenium is an important antioxidant used to support the immune system, heart health, and thyroid function. Deficiencies in selenium can weaken the cartilage in your joints, something you want to avoid given how much pressure we put on our joints through during yoga. You don’t need a lot so it’s safest to get this trace element in whole food form.

Where to find selenium – Brazil nuts, grains, brewer’s yeast, egg yolks, garlic, whole grains, broccoli, dairy products and red meat.

Low iron is the classic diagnosis for someone who has low energy and finds it hard to recover after a workout. Iron is responsible for transporting oxygen to the blood. When you are exercising, your muscles need oxygen to function. This is also why learning to breath properly doing a workout is essential.

Where to find iron – Green leafy vegetables, pumpkin seeds, eggs, fish, red meat, poultry, liver, fortified foods, nuts, peas, whole grains.

Essential for thyroid function and regulates the function of every cell in your body. Due to soils having naturally varying amounts of iodine, you may need to find supplements and iodized food to ensure you are getting enough.

Where to find iodine – Kelp, iodized salt, seafood, saltwater fish, corn, prunes.

Supports strong bones and muscles and assists in metabolizing calcium, magnesium and phosphorus. Boron is also believed to reduce the symptoms of arthritis as well as support cognitive functions such as hand-eye coordination and short term memory, all skills that yogis need to be safe and successful.

Where to find boron – apples, dates, oranges, plums, sultanas, kiwifruit, carrots, grapes, pears, whole grains, avocado, soybeans, chickpeas, hazelnuts, peanuts, lentils, onion,  and potatoes.

Find yourself drinking gallons of water but still feeling thirsty? Get half way through a workout and have to stop due to muscle cramping? Your body is probably in need of electrolytes such as sodium. This mineral maintains the body’s water balance and is one of the key ingredients in sports drinks. Skip the sugars, though, and get sodium from these other sources.

Where to find sodium – olives, miso, celery, shrimp, ham, salt.

This mineral supports nerve and muscle health and is also an electrolyte like sodium. It can also help to stabilise blood sugar levels and blood pressure. Insufficient potassium can lead to muscle weakness and dehydration.

Where to find potassium – Coffee, bananas, whole grains, molasses, parsley, mushrooms, pumpkin, fish.

Supports bone health, cell renewal and your metabolism. Phosphorus is also needed to make ATP (adenosine triphosphate) a molecule which provides energy to our cells. It is rare to be lacking in phosphorus but if you find you have a low appetite or muscle pain it may help to add some of these foods to your diet.

Where to find phosphorus – asparagus, corn, pumpkin seeds, bran, pulses, leafy green vegetables, eggs, beans, lentils, pork, dairy products,

Essential for healthy bones and the functioning of nerves and muscles. Magnesium is also a relaxant and can be used to soothe aching muscles. Add some Epsom Salts (Magnesium Sulfate) to your bath or start taking magnesium supplements to support recovery after a workout.

Where to find magnesium – Eggs, green leafy vegetables, shellfish, dairy products, nuts, whole grains, almonds, wheatgerm.


* This content is not intended to be a substitute for professional medical advice, diagnosis, or treatment. Always seek the advice of your physician or other qualified health professional with any questions you may have regarding a medical condition.

Categories
Blog

The Importance of Breathing

I recently came across a new article by Monika from The Dance Training Project titled “7 Rules for a Highly Effective Movement Practice”.

I’ve followed Monika for a long time, enjoying her thoughts about safe dance training and body awareness. She currently works in Toronto, helping dancers to improve their technique by retraining movement patterns for better alignment and injury prevention. It’s a valuable practice and her insight is relevant to all kinds of dancers and athletes.

In her most recent article Monika makes a point about breathing. My yoga practice has encouraged me to think about the relationship between breath and movement. Vinyasa is defined as “a method of yoga in which movements form a flowing sequence in coordination with the breath.” Breathing properly not only brings oxygen into the blood and to the muscles, it also ensures you are moving from a place of calm and not from a fight-or-flight mode that can lead to tension and injury.

When trying new poses in yoga the excitement of floating on your hands, or being upside-down, gritting your teeth while you sustain a posture, and the if-I-can-just-ahhh-get-my-foot-to-reach-aahhh-just-there mentality, often results in yogis forgetting about their breath. Holding your breath in, or out, causes the mind and body to become tense and a tense body loses it’s ability to be flexible and strong.

Monika points out,

“If you cannot breathe during the movement, you do not own the movement.”

and she goes to explain,

“Your emotional state and physical health can be interpreted via the quality of your breath, as well as your ability to load and use core musculature to provide dynamic stability and decelerate spinal motion.

In motion, if you can demonstrate a diaphragmatic breathing pattern, you are in charge. Good work.”

Consider a pose that you feel most comfortable with. Beginner or advanced, it does not matter. Many people find a shoulder stand fairly comfortable. It’s a go to for beginning to enter the relaxed state for the end of the practice, and is a good entry point for beginners to feel what it is like to hold a position upside-down.

I’d bet you can breathe fully and completely while holding a shoulder stand. You’re so comfortable that you can even make your legs into other shapes. It may even be such a resting pose you can hold it for 20 breaths or more.

Now think about a pose that requires more effort for you. It may be a crow pose, headstand, firefly, or even log pose. What is your breath doing when you attempt these poses? Can you breathe, as Monika says, with a “diaphragmatic breathing pattern”? Or are you taking shallow breaths barely filling the upper part of your lungs? Are you holding your breath?

If you video your practice, you may even be able to see your face change as you grit your teeth and the tendons in your neck pop, all signs that you are not breathing properly and not “owning the movement”.

If you are still unconvinced that all of this matters, consider how the quality of your breath will also effect the quality of the movement. A practitioner who has been holding their breath as they hold a pose, is going to have to breathe eventually, usually with a gasp that will interrupt their flow and progression into the next pose.

So how do you find space in your dance to breathe?

I recall an instructor once asking us spontaneous questions while training. He suggested a pose, an headstand for example, and then asked us to stay in the pose and call out five names. This experience forced our brains to change tack, most often allowing our breath to return to state of normal while we focused on a different task. The act of talking also changes the way you hold your face and neck, allowing a more natural breathing pattern to resume.

Try it for yourself and feel how your own breath changes the movement. Prepare for an inversion and inhale as you go upside-down. Now try it again with an exhale. Some people suggest inverting with your mouth slightly open, reducing the chance that you will grit your teeth. Record yourself or do it with a friend and see if they can see the difference. Most likely, you will also find that the movement feels different to you too.

Once you have experimented with this, consider how you breathe when moving through other poses, or throughout an entire practice. I’ve been known to write in breaths into my teaching notes as conscious reminders of when to check in and make sure I, and my students, are breathing properly.

If you are interested in learning about breath work, pranayama, or how to assess the quality of your breathing during your yoga practice, contact me for a Live Coaching Session!

Categories
Blog

Wrist Care

As humans, we have spent a lifetime walking on our feet and ankles. As yogis and aerialists we now spend hours a day trying to balance and hold ourselves up on our hands and wrists. If you are finding that your wrists and/or forearms hurt when attempting various poses, or ache after a workout, you are not alone. Aside from shoulder injuries and torn hamstrings, wrist injuries are one of the most common aliments for yoga enthusiasts.

Personally, I have a genetic predisposition to Carpul Tunnel Syndrome. My mother, grandmother, and great aunt, have all had various surgeries to reduce pain and support their mobility and well being in their wrists. Hopefully, the strength and mobility I have attained from yoga and aerial training is working in my favour. I still get odd nerve pains and tenderness, but have found massage, nerve flossing, and rest (which even included learning how to use my computer mouse with my left hand!) are all effective in reducing pain and allowing me to continue training.

I have known many yogis who suffer from wrist ailments, such as ganglion cysts which all impact on their ability to practice. It is important to listen to your body and know when to stop or alter a move. There is no use pushing through and hoping the pain will go away. Many poses can be accomplished with the forearm on the ground, or by making a fist and resting on your knuckles, which allow the wrist to stay in a more neutral position.

Disclaimer – The following content is not intended to be a substitute for professional medical advice, diagnosis, or treatment. Always seek the advice of your physician or other qualified health professional with any questions you may have regarding a medical condition.

The wrist is a very complex set of joints, ligaments, and nerves that support the movement of the hand in four directions – flexing, extending, and deviating side to side. The wrist can also twist, what is known as pronation and supination.  The structure of the wrist is made up for four main ligaments, three nerves, eight carpul bones, and five metacarpal bones. It goes without saying that a lot can go wrong if you fall on your wrist on put pressure on it in the wrong way!

It is important to warm up the wrists just like you warm up the rest of your body before getting on the mat. As well as wrist circles and stretches for the forearms and fingers, try this exercise:

Wrist lifts from all fours –

Moving your hands closer or further away from your body will alter the amount of pressure and change the required strength to execute the move. What you are aiming for is quality of movement over quantity. Try to make the movement as smooth as possible. You also don’t want to fatigue the wrists. This exercise involves lots of tiny muscles, ligaments, and tendons, that may not be used to working out.  5-10 repetitions as part of your warm up is more than enough.

If you have a theraband there is also a great wrist exercise you can do with a door handle or a railing. Standing next to the rigging point with the theraband at waist height, wrap the band around your palm and make a fist. Bring your elbow to you waist so your forearm is pointing out in front of you. Move away from the rigging point to increase the tension in the band. Fold your hand down (in flexion) with your hand in a fist and slowly release back to a neutral position. Repeat 5-10 times with both hands. The tension offered by the theraband will support muscle strength throughout the wrist joint.

Massage can be great for the wrists too, especially after a practice session. You can massage your own wrists with the opposite hand, or if you are lucky to have a friend to help you, this is a great partner exercise –

Have you partner interlock their fingers with yours as they are facing you. Let your hands and arms go limp, as your partner shakes your hands up down. They can alternate with large motions or short and fast ones. I find this exercise is great for releasing lactic acid after a workout.

In all yoga poses where you are placing pressure on the wrist, try to ensure that you are forming a straight line from the elbow to the wrist.

  • Our grip strength comes from the shoulder blade (scapula) and not from the wrist. This results in activating all of the muscles of the core body instead of using only one specific group, that of the forearm.
  • We prevent prolonged hyperextension of the wrist, which might even lead to a carpal tunnel syndrome.”

As yogis and fitness enthusiasts we all dream of being able to continue flying forever and ever. But to do this, we need to take care of ourselves. Listening to our bodies, stopping moves that cause pain, and developing good technique to reduce injury are essential for any dancer. Taking appropriate rest days to let our bodies heal will also ensure we can move with strong, healthy bodies right into our 80s!\

If you are interested in learning more about wrist care, or want advice for making adjustments to your own yoga practice, or at home workout, contact me for a Live Coaching Session!

Categories
Blog

Safety with Backbends

Ask any yogi or aerialist about their goals and no doubt they include working on back flexibility. If they were a gymnast or ballerina as a child they may remember doing walk overs and wearing “foot-hats” and hope that their muscle memory allows them to return to being so supple and bendy. Yet, even for yogis who only took up the practice as adults, we all dream of beautiful lines and elegant shapes created by a strong and flexible back arch.

But what is the best way to practice bending backwards? Are all bodies able to do back bends?

Firstly, let’s look at what you are trying to achieve. Vertical Wise published a great article in 2016 showing how, depending on which part of your back is naturally more flexible, what your back bend may look like (in an ideal world where we can all sit on our heads!)

It has been said that although you can lengthen the muscles, tendons, and fascia, that support the spine, the actual space between the bones is set as of puberty (Source). This does not mean that we should all stop flexibility training all together, but it does help us set realistic goals and learn to approach the practice of back bending from a safe perspective.

When you attempt a back bend pose on the floor, you are enlisting the help of your hips, glutes, quads, shoulder, lats, and your neck. Therefore, one of the first points to consider when embarking on safe back bending is that you also need to stretch and learn to engage these other parts of your body. Injuries, especially in your lower back, may occur from continually putting pressure on the spine in an attempt to push deeper and deeper.

Stretches for your latissimus dorsi can be effective in helping to “open up” the upper back. Lunges and reclining poses that focus on the quads, hip flexors, and psoas, will also help to ensure the final poses are not putting too much strain on your lower back.

In each of these preparatory poses, try to think of opening the chest and staying long through the spine. Try not to throw your neck back more than necessary as this is also a common area for sprains and injuries. Yoga wheels and other props can help you form a safe shape as you learn to bend backwards, however learning how to hold a strong back bend should always be the goal, not just learning how to fall into one.

Different practitioners have opposing views about whether it’s a good idea to engage the glutes during back bends. It is possible that by engaging your glutes you can increase the stretch in your hip flexors, and reduce the load on your lumbar spine, but squeezing your butt may also externally rotate the legs and put you out of alignment. The glutes are made up of three muscles, two of which externally rotate the hip and one that internally rotates the hip. Learning to engage the lower gluteus minimus separately from the others may work in your favour to stabilise and increase the range of motion in your back bends. Practicing bridges from the floor with proper alignment will help you connect with this muscle. I also recommend reading this article by Roger Cole, Ph.D, for some simple and effective exercises to learn how to engage your glutes for safe back bends.

From a personal stand point, I have seen more improvement in my back flex and strength since joining a contortion class at the circus. I believe this is not only due to having professional instructors, but also due to the added diversity and consistency of my practice. In two, hour long classes a week we explore back bending from every angle – bridges and wheel pose, camel pose, bow pose, forearm stands, dancers pose, chest stands, as well as classic contortion positions for the more flexible students. Rather than just holding each shape as a static pose, we are encouraged to be actively entering and exiting the pose working to build strength in the posture as well as increasing our range of motion.

The many ways to enter/exit wheel pose include:

  • lying on your back, hands over head, push up
  • drop backs or walking your hands down a wall to the floor (and reverse back to standing)
  • from a handstand, flipping over to land your feet on the floor or mat (and reverse back to standing)
  • sitting, externally rotate one hand and push up, drawing an arc with your other hand until it reaches the floor underneath you (both sides)

Once you are in wheel pose there are also variations like lifting one leg, straightening both legs, or sinking your butt down to create a hollow back shape.

Some of these entries may feel better for your body than others. I still cannot drop back into a wheel pose, but I can get quite deep bends using the strength in my arms and legs to push up. I am still practicing my drop backs though, going back as far as I can from standing, holding and breathing, and then returning to standing with control and with focus on alignment.

“An honest way to train yourself into deeper backbends is to practice hands-free. When you remove your hands from backbends, you’re forced to work your core and spinal muscles. You can’t cheat how deep you get when your hands aren’t pushing you past what you can hold with integrity”

(Source)

Dancers who have a tendency to hyperextend their elbows, may also benefit from practicing hands free as they won’t be putting any pressure on the joint until their hands touch the floor in the final presentation of the pose.

You can also go hands free dropping back in camel pose.

Or lifting hands free from the floor.

These are great exercises to add to your practice as they will strengthen your back and core and help you learn to connect with the muscles that will support your back bends. Training this way will ensure you are also not falling into a bend that you don’t have the strength to maintain.

It can be scary to start practicing back bends on your own. Try joining a flexibility or contortion class or start small and train with a friend to help as a spotter. From a yoga perspective, back bends are considered to

“stimulate the proper functioning of the digestive system, help preserve the health of the vertebrae and spinal disks, and open the body to deep diaphragmatic breathing.” (ref)

You may also find that regularly practicing back bends improves your posture as well, countering bad habits of slouching at you desk and in front of your computer. A friend used to move her laptop to the floor and work in sphinx pose, challenging her upper back and shoulders for up to 20 minutes or more. If you have a flexible work space this is a great way to add some extra back bend practice to your day. Just be careful not to overdue it, remembering to pull your shoulders back and down and keep the neck long as you look forwards.

Finally, every back bending session should be matched with counter poses. In any yoga class if your training involved lots of back bends, on the floor or with props, counter these poses with some forward bends – seated forward bends, plough pose, wall assisted forward bends, and some spinal twists. Don’t forget to breathe deeply into the upper, middle, and lower back in these poses and remember to lengthen and extend. Relaxing with shavasana and giving your body time to assimilate your practice will also support you adapting to your new bendy self!

If you are interested in learning more about back bends, or would like to introduce some back bending poses into your own yoga practice, contact me for a Live Coaching Session!